Sunday 15 November 2009

Shawl in the making

I'm famous for starting projects and not finishing them. Let's see if this is another one! I'm currently making these fun and easy hexagonal crochet patches and the plan is to join them up to form a shawl. They take about 15 minutes each to make so it shouldn't take too long, unless I get bored very quickly :)


This is pretty much free hand and very easy for anyone who knows how to crochet. I was going to write down instructions but I'm not sure of the translations for the stitches!

Wednesday 11 November 2009

The seasons while away

I've been so busy with university exams, parental birthdays and all manners of stuff that my updating here has been non-existant. The whole autumn has passed! I finally finished sorting our pictures from the trip to the US this summer and it feels like just moment ago that we were sitting in this café on Block Island (off the coast of Rhode Island), eating Ben & Jerry's in the sweltering 30 degree heat:


Autumn started the first week of October - a bit late for Sweden. It was as if someone snapped their fingers and lowered the temperature by 10-15 degrees. October was crisp and beautiful and the autumn foliage was pretty for several weeks. Here's a tree on our street:


With November, gusty winds blew away the last of the yellowing leaves and the regular Thursday sweeping (and later on ploughing) of the street began. Just as October was as autumnal as autumn could ever be, November is as grey as always. We haven't seen the sun for nearly two weeks as a seemingly impregnable cover of cloud hangs damply over Stockholm. But I make the most of it and write, draw and stitch. And on days like these when I'm feeling at my most house-wifey, I like to have something hearty cooking for when my man comes in from the cold and rain. These are my ingredients, I hope it turns out well:

Sunday 4 October 2009

Birthday card

I love making my own cards. It doesn't take that long, and most people think it's really nice to get something handmade and personal. Yesterday I was invited to a birthday dinner by my My Little Pony-crazy friend, and this is the card I made for her:


You can't see it in that first picture, but the rainbow and clouds were made out of glittery paper (yes, I was a bit too lazy to make that myself) to add that fairytale sparkle!


It was a lovely dinner too :)

Friday 2 October 2009

Progress so far.

I'm not the quickest of stitchers, and the fabric is very fine, but here's the progress I've made in the last couple of days. Bear in mind I go to university, spend time in the library reading dull Icelandic sagas, play my computer games and do a million other things every day as well. I'm aiming at one square a day, and it'll be done in about 3 and a half months :)


If anyone's interested, I already mentioned using a fabric with 7 squares to a centimetre. I'm using 2 (out of 6 parts) threads Mouliné yarn and a size 24 blunt tapestry needle.

Photoshop pattern guide. Part 2 - working with the pattern.

In this next section, I'll describe how to work with the pattern that we made in the last post. If you followed the steps and look at the result, you'll now see a teeny tiny picture and you're probably wondering how the hell this is supposed to help you do a marvellous 45cm wide Monkey Island tapestry!

The key to this is simply zooming in. Use the magnifying tool to zoom in to 3200% and this is what you will see!


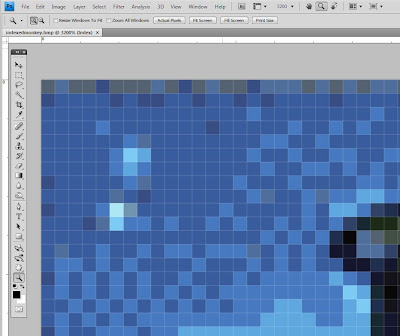
It can't really get any clearer than that. Well of course it can. Now that you have a clear pattern to work with, you may want to sort out what colours you'll be using. When I said 32 colours I probably meant 29. Photoshop always adds pure white, pure black, and transparent in their colour table. None of these colours will typically be found in a picture. Still, there are a lot of shades of blue in this picture, and to try and organize them, I use the Color Table.

Go to Image > Mode > Color Table...

You will now see a colour palette with the 32 (29) colours in your picture.


This is a great help when picking colours. If you're very picky about the colours, you can fill entire blank documents with each colour and match them against your threads. Since I didn't have any threads at all when I started this, I had great help from the DMC yarn website and their colour cards. I then made a list which looked something like:

1. Black (not in picture)
2. White (not in picture)
3. Dark purple (154)
4. Blackish blue (939)
...
etc - the numbers 1-32 describing the place in the colour table and the following numbers being the DMC thread colour number.

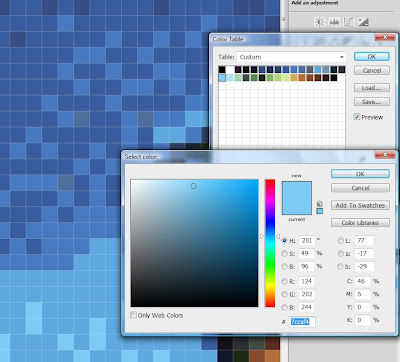
The final step is starting to stitch. Once again, I found that the shades of blue were a bit confusing to me, especially when you're counting stitches. And once again, the colour table is a great help. It lets you change one colour at a time, so just pick the colour thread that you want to start with, go to the colour table, highlight the chosen colour and then use the palette to specify a new colour - something that shows up against the other blues.


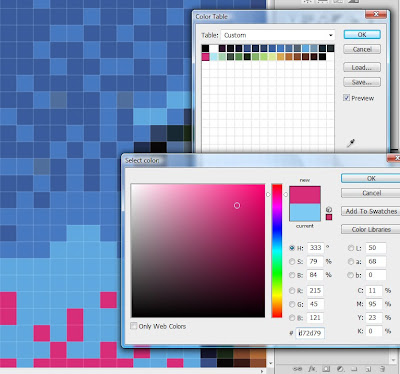
This makes it ever so easy to see where the colour should go and where it shouldn't!

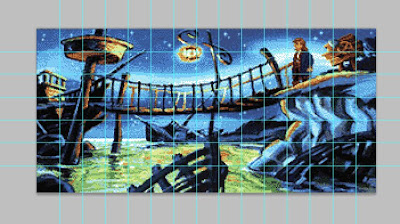
Finally, I wouldn't dream of doing this one full row at a time. Instead, I used the photoshop ruler guides (go to View, tick Rulers and you can pull out guides from the top and side rulers) to divide my pattern into managable squares. I then stitch one square at a time:


Of course, you could use this technique to make a pattern out of any picture. Just pick your size, and your number of colours and you're off!

Photoshop pattern guide. Part 1 - making the pattern.

I don't know if there's another, simpler way of doing this, but this wasn't overly hard. I'm using Photoshop, but I'm sure most programs (at least any that go beyond Paint) will have something similar.

OK, if you look at the picture in the post I made yesterday, we can think a while about how long it would take to make that into a cross stiched picture. And we can think about how big it would be. The screenshot is from a 640x480 version of Monkey Island 2, meaning that if I were to sew it with my current fabric (the weave that you stitch onto) and using every pixel as a stitch, it would be 91 cm wide. That's of course enormous, so I decided to cheat a bit and make the screenshot into 320x240. There was a version released for Amiga with that resolution, so let's just pretend we're making that one! This means cutting the size in half.

The second problem is that the original screenshot has 256 colours. Now, I don't know about you, but that's a few more than I have in mind when I think about a regular cross stitch pattern. Since I wanted to keep both some detail, and stay true to being as nerdy as possible with this project, I decided to scale it down to 32 colours.

Below, I will describe step by step how to sort the colours and the size of the pattern.

First of all, you want to sort the colours. Go to Image > Mode > Indexed Color... (as shown in the screenshot below)


In the Indexed Color window that pops up, adjust the number of colours to one that suits you. In this case I scaled it down from 256 to 32. Apply the change. You will notice how the picture loses some in detail.


Next, resize it to fit your needs. I'm using a fabric with 7 squares (ie 7 stitches) to the centimetre. It was one of the finest fabrics I could find, because I knew the picture would be huge anyway. So think about how big the picture will be. 320/7 is still 45 and a bit centimetres wide.

Go to Image > Image Size... and specify the width. Remember to do it in pixels, not cm or inches! Also remember to lock width and height if it's not already preset (when it's locked, you see the little chains to the right of the boxes). This will maintain the proper proportions for the image. If you're wondering why my picture isn't in fact 320x240, I decided to cut out the toolbar and inventory bits of the game screenshot and just sew the picture element.


This is the resized and re-coloured image. This is actually shown at 200% because the picture is now half the size. Zooming will be your best friend, but I'll explain that in the next part!


PS. Don't use the above images as patterns. They're reduced in quality and simply screenshots of an imagine zoomed into 200%. Never work with jpg files if you can help it, try to keep them in .psd form while you work with them to save you from losing too much information.

Thursday 1 October 2009

My mammoth cross stitching project!

When I was around nine years old I developed a love for cross stitching. My hand wasn't quite as steady and controlled as I wanted it to be, and sewing a picture that was 100% accurate attracted me enormously when I failed to draw things perfectly. In my teens I grew better and better at drawing and eventually dropped my stitching completely, denouncing the whole idea as pointless and old fashioned. Apart from the result itself, I always found stitching very meditative and soothing and secretly missed that part of it.

This weekend, we went to watch the Dalí exhibition at the modern arts museum here in Stockholm. The main exhibition was stupidly busy and we ended up spending more time looking at the regular collection. A lot of the newer additions were crafted in the more traditional sense of the word. There were rugs, a lot of fabrics and textiles and so on, and I spotted a miniscule piece of art that was a wonderfully detailed cross stitching. If I'd been thinking twice about the coolness of cross sticthing, my doubts were now all gone.

The motive was much easier to find than the motivation. I've recently been playing some of the old computer games I used to play when mum got her first PC some 20 years ago. My all time favourite game was Monkey Island 2 - LeChuck's Revenge. You all know how these old games are of such low resolution, you can practically see each pixel. And there it was. It's a goddamned pre-made pattern, innit? As it turns out, it wasn't as easy as all that, but definitely worth the effort.

This project is now in the making and underway. In the next couple of days I'll describe for those who are interested how to sew a cross stitch picture from a screenshot. As a teaser, and to liven this post up a bit, I present to you the earliest version of my pattern:


Daunting, wouldn't you say? Definitely something to keep me occupied on a rainy night in.