OK, if you look at the picture in the post I made yesterday, we can think a while about how long it would take to make that into a cross stiched picture. And we can think about how big it would be. The screenshot is from a 640x480 version of Monkey Island 2, meaning that if I were to sew it with my current fabric (the weave that you stitch onto) and using every pixel as a stitch, it would be 91 cm wide. That's of course enormous, so I decided to cheat a bit and make the screenshot into 320x240. There was a version released for Amiga with that resolution, so let's just pretend we're making that one! This means cutting the size in half.
The second problem is that the original screenshot has 256 colours. Now, I don't know about you, but that's a few more than I have in mind when I think about a regular cross stitch pattern. Since I wanted to keep both some detail, and stay true to being as nerdy as possible with this project, I decided to scale it down to 32 colours.
Below, I will describe step by step how to sort the colours and the size of the pattern.
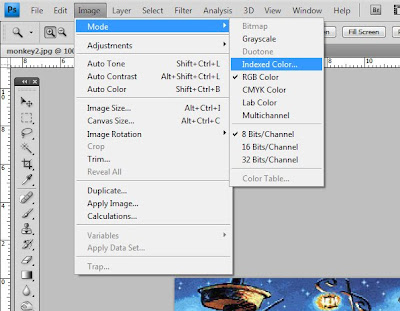
First of all, you want to sort the colours. Go to Image > Mode > Indexed Color... (as shown in the screenshot below)

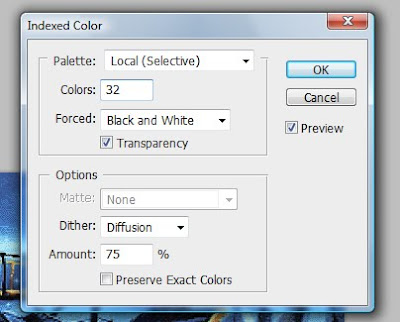
In the Indexed Color window that pops up, adjust the number of colours to one that suits you. In this case I scaled it down from 256 to 32. Apply the change. You will notice how the picture loses some in detail.

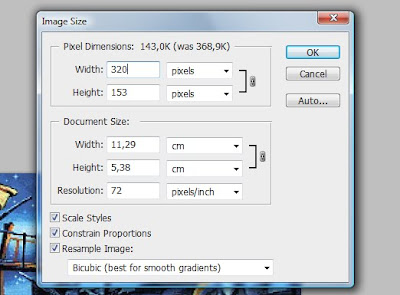
Next, resize it to fit your needs. I'm using a fabric with 7 squares (ie 7 stitches) to the centimetre. It was one of the finest fabrics I could find, because I knew the picture would be huge anyway. So think about how big the picture will be. 320/7 is still 45 and a bit centimetres wide.
Go to Image > Image Size... and specify the width. Remember to do it in pixels, not cm or inches! Also remember to lock width and height if it's not already preset (when it's locked, you see the little chains to the right of the boxes). This will maintain the proper proportions for the image. If you're wondering why my picture isn't in fact 320x240, I decided to cut out the toolbar and inventory bits of the game screenshot and just sew the picture element.

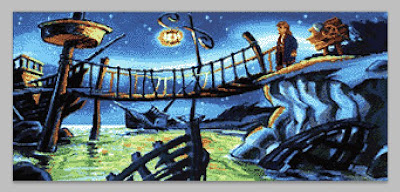
This is the resized and re-coloured image. This is actually shown at 200% because the picture is now half the size. Zooming will be your best friend, but I'll explain that in the next part!

PS. Don't use the above images as patterns. They're reduced in quality and simply screenshots of an imagine zoomed into 200%. Never work with jpg files if you can help it, try to keep them in .psd form while you work with them to save you from losing too much information.
No comments:
Post a Comment